

我们已经详细介绍了 Action,Reducer,Store 和它们之间的流转关系,Redux 的基础知识差不多也介绍完了,但 Redux 不是 React 专用,它也可以支持其他框架,本篇介绍一下如何在 React 里使用 Redux!
清单
- Provider
- connect 之 mapStateToProps
- connect 之 mapDispatchToProps
- connect 之 mergeProps
- 实现原理
先要安装一下 react-redux 包:
yarn add –D react-redux根据官网推荐将 React 组件分为容器组件 container 和展示组件 component。为了使代码结构更加合理,我们如下图,在项目根目录里新建 container 和 component 目录。container 目录里的组件需要关心 Redux。而 component 目录里的组件仅做展示用,不需要关心 Redux。这是一种最佳实践,并没有语法上的强制规定,因此 component 目录的组件绑定 Redux 也没问题,但最佳实践还是遵守比较好,否则业务代码会比较混乱。
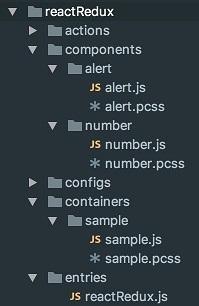
components 目录下放两个供展示用的 alert 和 number 组件,这两个组件完全不会感知到 Redux 的存在,它们依赖传入的 props 变化,来触发自身的 render 方法。本系列不是 React 教程,React 组件的代码请自行参照源码。
containers 目录下的 sample 组件会关联 Redux,更新完的数据作为 alert 和 number 组件的 props 传递给它们。
组件都被抽出后,原本 entries 目录下的文件中还剩下什么呢?entries/reactRedux.js:
    import { Provider } from 'react-redux';     // 引入 react-redux

    ……
    render(
          <Provider store={store}>
            <Sample />
        </Provider>,
        document.getElementById('app'),
    );
react-redux 包一共就两个 API:
入口解决了,我们看一下 sample 组件是如何用 connect 方法关联 Redux 的。先看一下 connect([mapStateToProps], [mapDispatchToProps], [mergeProps], [options])方法,签名有点长,参照 containers/sample/sample.js:
const mapStateToProps = state => {
  return {
    number: state.changeNumber.number,
    showAlert: state.toggleAlert.showAlert
  };
};

const mapDispatchToProps = {
  incrementNum: action.number.incrementNum,
  decrementNum: action.number.decrementNum,
  clearNum: action.number.clearNum,
  toggleAlert: action.alert.toggleAlert
};

export default connect(
  mapStateToProps,
  mapDispatchToProps
)(Sample);
connect 之 mapStateToProps
connect 的第一个参数 mapStateToProps 是一个 function:[mapStateToProps(state, [ownProps]): stateProps],作用是负责输入,将 Store 里的 state 变成组件的 props。函数返回值是一个 key-value 的 plain object。例子代码里是:
const mapStateToProps = state => {
  return {
    number: state.changeNumber.number,
    showAlert: state.toggleAlert.showAlert
  };
};
函数返回值是一个将 state 和组件 props 建立了映射关系的 plain object。你可以这样理解:connect 的第一个参数 mapStateToProps 就是输入。将 state 绑定到组件的 props 上。这样会自动 Store.subscribe 组件。当建立了映射关系的 state 更新时,会调用 mapStateToProps 同步更新组件的 props 值,触发组件的 render 方法。
如果 mapStateToProps 为空(即设成()=>({})),那 Store 里的任何更新就不会触发组件的 render 方法。
mapStateToProps 方法还支持第二个可选参数 ownProps,看名字就知道是组件自己原始的 props(即不包含 connect 后新增的 props)。例子代码因为比较简单,没有用到 ownProps。可以 YY 一个例子:
const mapStateToProps = (state, ownProps) => {
  // state 是 {userList: [{id: 0, name: 'Jack'}, ...]}
  return {
    isMe: state.userList.includes({ id: ownProps.userId })
  };
};
当 state 或 ownProps 更新时,mapStateToProps 都会被调用,更新组件的 props 值。
connect 之 mapDispatchToProps
connect 的第二个参数 mapDispatchToProps 可以是一个 object 也可以是一个 function,作用是负责输出,将 Action creator 绑定到组件的 props 上,这样组件就能派发 Action,更新 state 了。当它为 object 时,应该是一个 key-value 的 plain object,key 是组件 props,value 是一个 Action creator。例子代码里就采用了这个方式:
const mapDispatchToProps = {
  incrementNum: action.number.incrementNum,
  decrementNum: action.number.decrementNum,
  clearNum: action.number.clearNum,
  toggleAlert: action.alert.toggleAlert
};
将定义好的 Action creator 映射成组件的 porps,这样就能在组件中通过this.props. incrementNum()方式来 dispatch Action 出去,通知 Reducer 修改 state。如果你对 Action 比较熟悉的话,可能会疑惑,this.props.incrementNum()只是生成了一个 Action,应该是写成:dispatch(this.props. incrementNum())才对吧?继续看下面介绍的 function 形式的 mapDispatchToProps 就能明白,其实 dispatch 已经被 connect 封装进去了,因此你不必手动写 dispatch 了。
mapDispatchToProps 还可以是一个 function:[mapDispatchToProps(dispatch, [ownProps]): dispatchProps]。改写例子代码:
import { bindActionCreators } from "redux";

const mapDispatchToProps2 = (dispatch, ownProps) => {
  return {
    incrementNum: bindActionCreators(action.number.incrementNum, dispatch),
    decrementNum: bindActionCreators(action.number.decrementNum, dispatch),
    clearNum: bindActionCreators(action.number.clearNum, dispatch),
    toggleAlert: bindActionCreators(action.alert.toggleAlert, dispatch)
  };
};
这段代码和例子代码中的 object 形式的 mapDispatchToProps 是等价的。世上并没有自动的事,所谓的自动只不过是 connet 中封装了 Store.dispatch 而已。
第一个参数是 dispatch,第二个可选参数 ownProps 和 mapStateToProps 里作用是一样的,不赘述。
connect 之 mergeProps
我们现在已经知道,经过 conncet 的组件的 props 有 3 个来源:一是由 mapStateToProps 将 state 映射成的 props,二是由 mapDispatchToProps 将 Action creator 映射成的 props,三是组件自身的 props。
connect 的第三个参数 mergeProps 也是一个 function:[mergeProps(stateProps, dispatchProps, ownProps): props],参数分别对应了上述 props 的 3 个来源,作用是整合这些 props。例如过滤掉不需要的 props:
const mergeProps = (stateProps, dispatchProps, ownProps) => {
  return {
    ...ownProps,
    ...stateProps,
    incrementNum: dispatchProps.incrementNum // 只输出incrementNum
  };
};

export default connect(
  mapStateToProps,
  mapDispatchToProps,
  mergeProps
)(Sample);
这样你组件里就无法从 props 里取到 decrementNum 和 clearNum 了。再例如重新组织 props:
const mergeProps = (stateProps, dispatchProps, ownProps) => {
  return {
    ...ownProps,
    state: stateProps,
    actions: {
      ...dispatchProps,
      ...ownProps.actions
    }
  };
};

export default connect(
  mapStateToProps,
  mapDispatchToProps,
  mergeProps
)(Sample);这样你代码里无法this.props.incrementNum()这样调用,要改成this.props.actions.incrementNum()这样调用。
至此 react-redux 的内容就介绍完了,一共就两个 API:
conncet 方法用于将组件绑定 Redux。第一个参数负责输入,将 state 映射成组件 props。第二个参数负责输出,允许组件去改变 state 的值。第三个参数甚至都没什么出镜率,例子代码就没有用到这个参数,可以让程序员自己调整组件的 props。
实现原理
接下来介绍一下 react-redux 的实现原理,需要一定 React 基础,如果你能看懂相必是极好的。但如果你只想使用 react-redux 的话,上述内容就足够了,下面的部分看不懂也没关系。
我们知道 React 里有个全局变量 context,它其实和 React 一切皆组件的设计思路不符。但实际开发中,组件间嵌套层次比较深时,传递数据真的是比较麻烦。基于此,React 提供了个类似后门的全局变量 context。可用将组件间共享的数据放到 contex 里,这样做的优点是:所有组件都可以随时访问到 context 里共享的值,免去了数据层层传递的麻烦,非常方便。缺点是:和所有其他语言一样,全局变量意味着所有人都可以随意修改它,导致不可控。
Redux 恰好需要一个全局的 Store,那在 React 框架里,将 Store 存入 context 中再合适不过了,所有组件都能随时访问到 context 里的 Store。而且 Redux 规定了只能通过 dispatch Action 来修改 Store 里的数据,因此规避了所有人都可以随意修改 context 值的缺点。完美。
理解了这层,再回头看
import React, { Component } from "react";
import PropTypes from "prop-types";

export default class Provider extends Component {
  static contextTypes = {
    store: PropTypes.object,
    children: PropTypes.any
  };

  static childContextTypes = {
    store: PropTypes.object
  };

  getChildContext = () => {
    return { store: this.props.store };
  };

  render() {
    return

<div>{this.props.children}</div>

;
  }
}
经过 conncet 后的组件是一个 HOC 高阶组件(High-order Component),参照React.js 小书的图,一图胜千言:
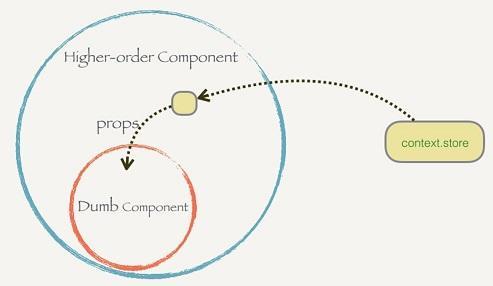
HOC 高阶组件听上去名字比较吓人,不像人话,我第一次听到的反映也是“什么鬼?”。但其实原理不复杂,说穿了就是为了消除重复代码用的。有些代码每个组件都要重复写(例如 getChildContext),干脆将它们抽取出来写到一个组件内,这个组件就是高阶组件。高阶组件内部的包装组件和被包装组件之间通过 props 传递数据。即让 connect 和 context 打交道,然后通过 props 把参数传给组件自身。我们来实现一下 connect。
第一步:内部封装掉了每个组件都要写的访问 context 的代码:
import React, { Component } from "react";
import PropTypes from "prop-types";

const connect = WrappedComponent => {
  class Connect extends Component {
    static contextTypes = {
      store: PropTypes.object
    };

    render() {
      return <WrappedComponent />;
    }
  }

  return Connect;
};

export default connect;
第二步:封装掉 subscribe,当 store 变化,刷新组件的 props,触发组件的 render 方法
    const connect = (WrappedComponent) => {
          class Connect extends Component {
              ...
            constructor() {
                  super();
                this.state = { allProps: {} }
            }

            componentWillMount() {
                  const { store } = this.context;
                this._updateProps();
                store.subscribe(this._updateProps);
            }

            _updateProps = () => {
                  this.setState({
                      allProps: {
                          // TBD
                        ...this.props,
                    }
                });
            };

            render () {
                  return <WrappedComponent {...this.state.allProps} />
            }
        }

        return Connect;
    };
第三步:参数 mapStateToProps 封装掉组件从 context 中取 Store 的代码
    export const connect = (mapStateToProps) => (WrappedComponent) => {
          class Connect extends Component {
              ...
            _updateProps () {
                  const { store } = this.context
                let stateProps = mapStateToProps(store.getState());
                this.setState({
                      allProps: {
                          ...stateProps,
                        ...this.props
                    }
                })
            }
            ...
        }

        return Connect
    }
第四步:参数 mapDispatchToProps 封装掉组件往 context 里更新 Store 的代码
    export const connect = (mapStateToProps, mapDispatchToProps) => (WrappedComponent) => {
          class Connect extends Component {
              ...
            _updateProps () {
                  const { store } = this.context
                let stateProps = mapStateToProps(store.getState());
                let dispatchProps = mapDispatchToProps(store.dispatch);
                this.setState({
                      allProps: {
                          ...stateProps,
                        ...dispatchProps,
                        ...this.props
                    }
                })
            }
            ...
        }

        return Connect
    }
完整版:
import React, { Component } from "react";
import PropTypes from "prop-types";

const connect = (mapStateToProps, mapDispatchToProps) => WrappedComponent => {
  class Connect extends Component {
    static contextTypes = {
      store: PropTypes.object
    };

    constructor() {
      super();
      this.state = { allProps: {} };
    }

    componentWillMount() {
      const { store } = this.context;
      this._updateProps();
      store.subscribe(this._updateProps);
    }

    _updateProps = () => {
      const { store } = this.context;
      let stateProps = mapStateToProps(store.getState());
      let dispatchProps = mapDispatchToProps(store.dispatch);
      this.setState({
        allProps: {
          ...stateProps,
          ...dispatchProps,
          ...this.props
        }
      });
    };

    render() {
      return <WrappedComponent {...this.state.allProps} />;
    }
  }

  return Connect;
};

export default connect;
明白了原理后,再次总结一下 react-redux:
conncet 方法用于将组件绑定 Redux。本质上是 HOC,封装掉了每个组件都要写的板式代码。
react-redux 的高封装性让开发者感知不到 context 的存在,甚至感知不到 Store 的 getState,subscribe,dispatch 的存在。只要 connect 一下,数据一变就自动刷新 React 组件,非常方便。
后记
源码已上传Github,请参照src/reactRedux文件夹。
评论 (0)